Microserver
A simple, personal web server Microserver is a simple, GUI controlled, easy to install, Java-based web server intended for use in "low duty", personal web server applications. You can
use it to allow access from other computers on your internal "Intranet" or allow access from the Internet with proper fire wall settings.
Microserver is a Java program that runs on whatever platform Java can run. It requires Java to be installed on your computer. See the installation page for more information. You can download Java from http://www.java.com.
To run Microserver you purchase an on-line subscription for one year from our on-line store. A subscription lets you download, use the tool, and get updates for 1 year. After that period, you retain and can continue to use the last version you downloaded.
When you subscribe, you will be emailed your initial login password for downloading. Subscribers can change their password at any time.
Links:
1. Subscribe
2. Download
3. Install
Discovery
Connect Me
Test Links
If you need help in getting started, you can email our Help Desk at help@eightolives.com.
Things you can do
- Run a personal web server on your PC.
- Provide free read access to web pages and documents placed in the "public" directory.
- Provide password protected access to documents in private project areas.
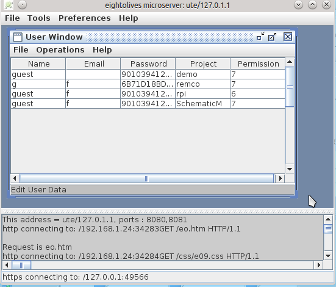
- Add and manage users and their project access privileges.
- Communicate using the http or the secure https web protocols.
- Provides external storage service for eightolives Schematic Mobile application.
- Limit access to your intranet or open access to the Internet world depending on your firewall settings.
- Edit mime type settings
Overview
Microserver configuration occurs when you first run the program. You are prompted to select a directory where key Microserver files will be stored. The directory includes two main subdirectories: "public" and "projects". The "public/docs" directory is where you put the HTML web pages and other documents you want to offer for public read access. (Your home page is the file "index.htm" in your "public/docs" directory. The file "eo.htm" is the eightolives options page.) The "projects" directory contains project subdirectories which can contain documents for which you wish to restrict access.
Most web servers support http URLs on the standard Internet port 80 and the secure https URLs on standard Internet port 443. Although you may select those ports via the Preferences menu, Microserver defaults to http access on port 8080 and https access on port 8081. These defaults are used because the standard ports 80 and 443 require Microserver to be run with administrative privileges (superuser) while use of ports 8080 and 8081 just require user privileges. Use of the non-standard ports also allow you to operate on your internal Intranet while limiting external Internet access to be controlled by your Internet router firewall settings.
The URLs to access your public documents take the form "http://xxx.uuu.yyy.zzz:8080/document_name.suffix" or "https://xxx.uuu.yyy.zzz:8081/document_name.suffix" where "xxx.uuu.yyy.zzz" is your IP address and "document_name.suffix" is the file name. For example, one of the URLs to your Home Page is http://127.0.0.1:8080/index.htm.
The IP address to access your data can take different forms. The IP address 127.0.0.1 is the loopback IP address which lets access your own computer without going out onto the Internet. If you are connected to a local network such as a WiFi router, your computer will be assigned 2an IP address that can be used by other computers on the Intranet. Local WiFi routers may assign an internal network IP address such as 192.168.1.19. You can determine your local network address using the command line command "ipconfig" or by examining your router's configuration status (typically accessed at http://192.168.1.1).
You can also automatically "discover" operating Microservers on your local network using the Discovery tool. The tool scans 256 addresses on your network and remembers previously discovered servers. The Discovery tool can also be started from the QuickApps menu.
The eightolives' web page Connect Me has two links that try to connect to your computer via the Internet. The "Connect to My Internet Address" link tries to access your computer on port 80 but will most likely link to your router's configuration status page or other firewall default page. The "Connect to my secure eightolives Microserver" link will attempt to connect to your computer using the https protocol on port 8081 (Microserver's default values). It will succeed only if the router's firewall configuration is set to allow Port Forwarding to your computer.
Link to your server's home page, index.htm on port 8080.
Look to your server's home directory on port 8080.
Link to the Demo project area. Log in as user "guest", password "guest123".
Look at the Demo project directory. Log in as user "guest", password "guest123".
Test to upload a file to the Demo project upload directory. The User must have Write access to upload.
